


Welcome to our in-depth Sequence analysis for Chisa, the 5★ Havoc Broadblade support in Wuthering Waves. With Chisa's banner now live in Wuthering Waves, many players face crucial questions: is she a must-pull "overpowered monster" or a niche specialist? should you pursue her S1 or her signature weapon? This guide will break down her key Sequences, provide clear damage comparisons, and help you decide which Sequence level—S0, S1, S2, or S6—is the right stopping point for your account.
Contents


Chisa Overview
Rarity: ⭐⭐⭐⭐⭐ | Element: Havoc | Weapon: Broadblade
Chisa introduces herself as "just an ordinary student," but her gameplay reveals a remarkably versatile Havoc support character. She excels in Negative Status teams by providing:
- Team Healing through her Death Snip (Normal Attack) and Resonance Liberation
- Team-Wide Shielding via her Sawring - Eradication finisher in Chainsaw Mode
- Crowd Control with scissor and chainsaw attacks that pull enemies together
- Powerful Debuffs - Her Unseen Snare enables 12% DEF Shred while her Outro Skill grants 18% DEF Ignore
- Flexible Roles - Can be built as pure support or hybrid sub-DPS
Her gameplay revolves around marking enemies with Unseen Snare, building Forte energy in normal state, then unleashing devastating chainsaw combos after using her Resonance Liberation to enter the enhanced "Woven Myriad - Convergence" state.


Key Sequence
Understanding Chisa's Sequences is crucial for making informed pulling decisions. Not all Sequences are created equal. Here are the game-changing breakpoints:
S1: Wandering Through the Desolate Corridors
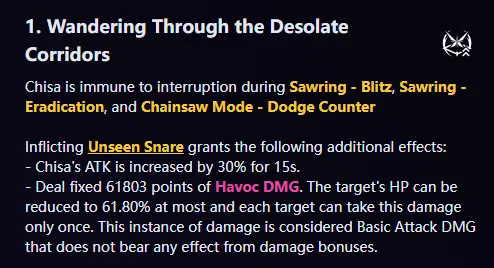
- Provides complete immunity to interruption during Chainsaw Mode combos
- Additional effects: 30% ATK boost and fixed damage when applying Unseen Snare
- Transforms her gameplay from easily interrupted to incredibly smooth
Effect: Immunity to interruption during Chainsaw Mode combos. Also provides an ATK boost and a one-instance fixed-damage hit when applying Unseen Snare.
The full crowd control immunity transforms her gameplay from easily interrupted to incredibly smooth and reliable. This is the recommended stopping point for most players.
S2: Into the Web of Endless Bonds
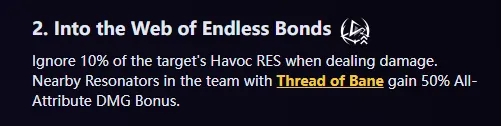
- Grants 50% All-DMG Bonus to teammates with Thread of Bane
- Provides 10% Havoc RES PEN
- Represents a significant team damage boost for Negative Status carriers
Effect: Grants 50% All-Attribute DMG Bonus to teammates with the Thread of Bane effect and provides Havoc RES PEN.
THE MOST IMPORTANT Sequence. A significant team damage boost. This solidifies her role as a top-tier support and is the ideal goal for players who want to maximize their Negative Status teams.
S6: Thus, Hope is Rekindled with the Rising Dawn
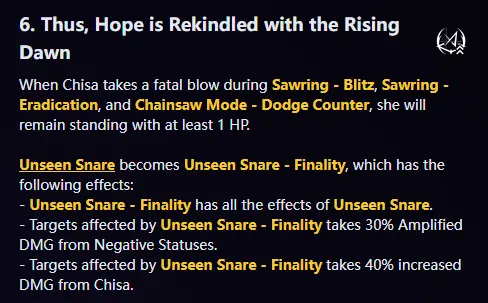
Effect: Provides a "cheat death" mechanic and upgrades Unseen Snare, making marked targets take 30% more Negative Status DMG and 40% more DMG from Chisa herself.
A massive personal damage increase, pushing her into a main DPS or powerful sub-DPS role. However, it is an extreme investment and not recommended for most players due to its high cost.
Damage Comparison
How much do these Sequences actually impact performance? Let's look at the data from community testing.
Team: Cartethyia (S0R1) + Ciaccona (S0R1) + Chisa
|
|
|
|


Baseline (S0 Chisa): Cartothyia's Finisher DMG: ~46,644
S1 Chisa: Cartothyia's Finisher DMG: ~50,096 (+7.4% team damage increase)
S2 Chisa: Cartothyia's Finisher DMG: ~59,971 (+28.5% team damage increase vs S0)
These numbers show that while S1 offers a quality-of-life and solid damage boost, S2 is where her team support potential truly skyrockets. Her S6 is a luxury that unlocks a completely different, high-damage playstyle.
S1 vs Signature Weapon
With approximately 2 Gold Budget, here's the detailed comparison:
S1 Advantages:
- Gameplay Transformation: Interruption immunity makes her chainsaw combos reliable in all combat situations
- Survival Utility: Prevents being knocked out of healing or shielding animations
- Damage Consistency: Ensures you can complete full damage rotations without disruption
- Future-Proof: The value of interruption resistance cannot be power-crept by new content
Signature Weapon (Kumokiri) Advantages:
- Statistical Power: 36% Crit Rate and 12% ATK provide solid personal damage increase
- Team Buffing: At max stacks, provides 24% All-DMG Bonus to the team
- Aesthetic Completion: Matches her visual theme perfectly
Damage Comparison in Cartothyia Teams:
- S1 Chisa (with 4★weapon): Cartothyia's Finisher DMG ~50,096 (+11.8% over R0)
- S0 Chisa (with Signature): Cartothyia's Finisher DMG ~48,500 (+8.3% over R0 with 4★)
- S1 + Signature: Cartothyia's Finisher DMG ~52,800 (Maximum performance)
The Verdict:
S1 Wins for Budget-Conscious Players
For players with a 2-pity budget, S1 is the unequivocal recommendation over her signature weapon. Here's why:
- Quality over Quantity: While Kumokiri provides nice statistical upgrades, R1 fundamentally fixes her biggest gameplay weakness - interruption vulnerability during her core damage and support rotations.
- Reliability Matters: No amount of extra Crit Rate or DMG Bonus matters if you can't complete your chainsaw combos. R1 ensures you consistently provide healing, shielding, and damage.
- Better Team Contribution: The ability to reliably execute full rotations without interruption means more consistent Unseen Snare application, more Havoc Bane stacks, and better overall team support.
- Weapon Alternatives Exist: Solid 4-star options like Aureate Zenith (Crit DMG) and Autumntrace (Crit Rate) can provide 70-80% of her signature weapon's performance, whereas no Sequence can replicate R1's interruption immunity.
But if resources are tight, go for S1 first. But Top up your Lunites at LDShop—secure, fast, and always at unbeatable prices. Get your pulls ready!
Pulling Recommendations
So, which Sequence should you aim for?
S0: She is perfectly viable at S0, offering full support capabilities. Pull if you just need a great healer/buffer for your Negative Status team.
S1: The Sweet Spot - HIGHLY RECOMMENDED
This is the most cost-effective stopping point. The interruption immunity is a game-changer for her gameplay feel and reliability.
S2: The Premium Support- HIGHLY RECOMMENDED
Players with sufficient budget are highly recommended to go for R2! The ideal choice for meta players who want to maximize the damage of their Cartothyia or other Negative Status carriers. A powerful and justifiable upgrade.
S6: Only for whales or players who absolutely adore Chisa and want her to be a primary on-field damage dealer. The damage is incredible, but the cost is prohibitive for most.
Chisa is a future-proof character whose value is set to grow as more Negative Status Resonators are released. For now, pulling her to S1 will provide an excellent experience. Consider S2 if you are all-in on the "Cartothyia-Ciaccona" core. Save your resources for future main DPS characters unless you are certain you want the ultimate S6 Chisa.
S2 is the key constellation that elevates Chisa to top-tier support status. Essential for players committed to maximizing their Negative Status teams long-term.
Conclusion
That's all for this blog! S2 is Chisa's key sequence and highly recommended for pulling! However, for the vast majority of players, S1 Chisa remains the most cost-effective build.
Bookmark this page and check LDShop WuWa Hub—we’ll update the moment new info drops, from kit numbers to best-in-slot gear and team templates.


 TOP UP WITH DISCOUNT NOW
Savannah Reed Experienced Game Editor
Savannah Reed is a senior game editor at LDShop.gg, specializing in in-depth coverage of RPG and strategy games. With a strong focus on titles like Wuthering Waves, Honkai: Star Rail and Whiteout Survival, she combines industry insight with firsthand player experience to deliver clear, informative, and actionable content. Her work is dedicated to helping gamers make smarter decisions—whether it’s understanding new updates or optimizing their in-game strategy.
